In this blog, I’ll show you how you can use the new TFS build system and Octopus Deploy to deploy your Azure Cloud Service. For those who do not know Octopus Deploy; Octopus Deploy is an automated software deployment and release management server. It is designed to simplify deployment of ASP.NET applications, Windows Services and databases. If you don’t already own an Octopus server you can easily create one within Azure. Go to Virtual Machines, click add and search for Octopus Deploy.
TFS Build
To be able to deploy our cloud service to Azure we need to create a package of our application. We do this by adding a build step, which will build our solution, and pass a couple of arguments to msbuild: /t:Publish /p:PublishDir=$(build.artifactstagingdirectory)\publish /p:TargetProfile=$(PublishProfile) /p:Configuration=$(BuildConfiguration) /p:Platform="$(BuildPlatform)" /m:1 The most important ones here are /t:Publish and /p:PublishDir. /t:Publish obviously tells msbuild that we want to publish our application. Since we have an Azure cloud project within our solution, msbuild understands we want to create a package. This package is being created in the folder you specify using /p:PublishDir. Later we will use the package, and anything else in this folder, to create a package that Octopus understands.
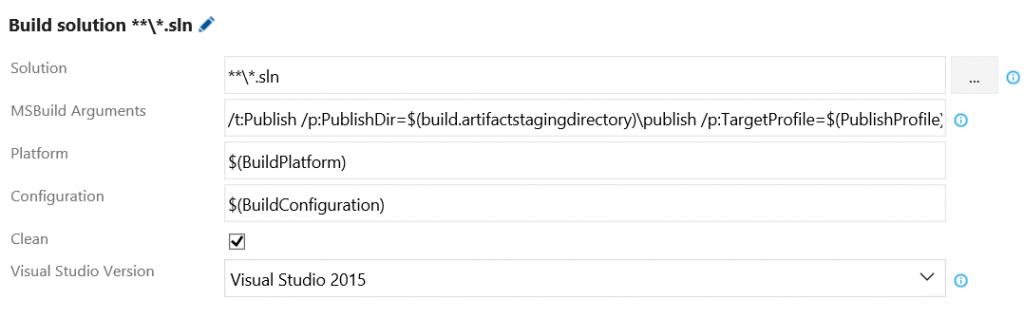
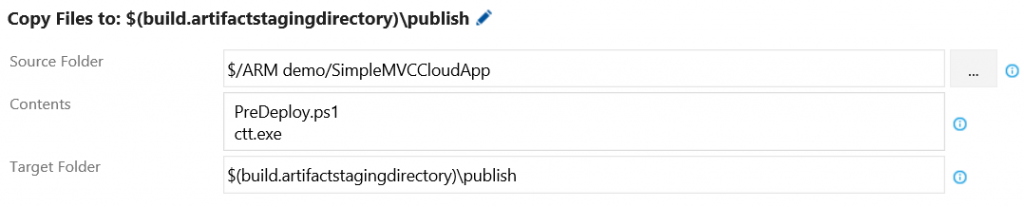
As configuration to build I always use my Production configuration. We will off course deploy our application to a test environment first. So, we will need to supply our test configuration to octopus as well so octopus can transform this configuration when we promote our application from our test environment to production. We need to do two things to make this happen. First, we need to copy our ServiceConfiguration.<Environment>.cscfg files from our Cloud Service project to the publish folder as shown below. Octopus will automatically choose the correct one during deployment.

| Second, we need to make sure that our web.<Environment>.config (webroles) or app.<Environment>.config (workerroles) files end up in our package as well. We do this by marking these files as build output within our solution. In Octopus we will transform the correct configuration and delete the one’s we do not need for that specific environment. More on that later. | 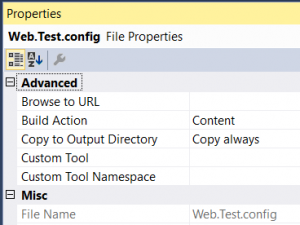 |
Package your application
Before you can deploy an application using Octopus, you’ll need to bundle all the files you want to deploy. So, we need to re-package our cloud service package with all the required configuration files and push this package to the build-in packages feed in Octopus.
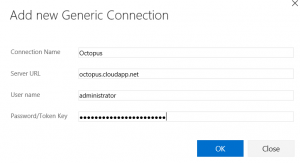
Here you’ll find an extension for TFS which adds steps to the build process which enable you to perform Octopus tasks. To be able to communicate with Octopus you’ll need to add a user in Octopus with Publish rights and add a service connection within TFS. To do this go to Settings -> Services and click new Service Endpoint -> Generic. Back to the build process. Add the Octopus Package step and configure it as shown below. The Package Id will be used to identify this package within Octopus so make sure it’s unique and describes your application well. The package version needs to be SemVer compatible or Octopus will give you an error.
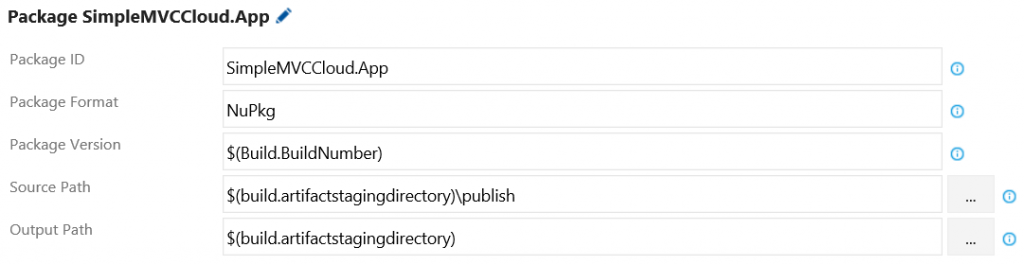
Now that we have created our package we need to publish it to Octopus. Add the Octopus publish step and configure it. Select the service endpoint you’ve just created and supply the path to the package. If all goes well, your package is now available in Octopus Deploy.
Octopus Deploy
Create a new project, go to process and add an ‘Deploy an Azure Cloud Service’ step. Within this step, choose your package from the build-in package feed.
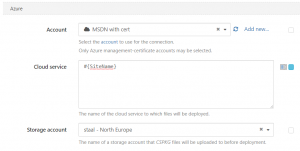
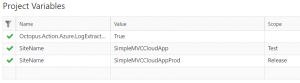
If you haven’t already done so, create an Azure Account and choose it here. I’ve configured the Cloud service parameter to use a variable. I do this to be able to switch between two environments. You could off course just use the Staging and Production slots within one Azure Cloud Service. I choose to have two cloud services and use Staging and Production slots in both of them. This way you can deploy to Staging in your test cloud service and make sure your role launches before swapping it to production. This to make sure even your test environment reaches a greater uptime and testers don't get disturbed by a role that doesn't launch.
Configuration and variables
Now there is one problem with Octopus Deploy and deploying Azure Cloud Services; Octopus doesn’t support web.config transformations within our Azure package out of the box (it does for anything else it can deploy). Off course you can manage all your settings in the ServiceConfiguration.*.cscfg files but this doesn’t work for example for WCF bindings and behaviors. Octopus gives you a lot of opportunities to do custom xml transformations. I found this to be not generic enough. Fortunately, Octopus allows you to perform some custom scripts during deployment. All you have to do is make sure there is a PowerShell file named PreDeploy.ps1 in your package and Octopus will pick it up. I’ve written the following scripts which reeds your ServiceConfiguration.<environment>.cscfg config and scans it for roles. For each of these roles its transforms web.config or app.config files using ctt.exe and deletes the one’s we don’t need. Add this script and ctt.exe to source control and add a build step to your process to make sure these files end up in your Octopus package.
$environment = $OctopusParameters["Octopus.Environment.Name"]

[xml]$XmlDocument = Get-Content -Path ServiceConfiguration.$environment.cscfg

$octopusServiceUnpackFolder = "LocalContent"

function IsWebRole(){
    return (Test-Path $folder\$role\"approot") -and  (Test-Path $folder\$role\"sitesroot")
}

function TransformWebConfig($folder, $environment){
    $source = "$folder\web.config"
    $TransformConfig = "$folder\bin\web.$environment.config"

    Write-Host "Converting $source with $TransformConfig to $source"

    & ".\ctt.exe" s:$source t:$TransformConfig d:$source

    Remove-Item "$folder\bin\web.*.config"
}

function TransformAppConfig($folder, $role, $environment){
    $source = "$folder\$role.dll.config"
    $TransformConfig = "$folder\app.$environment.config"

    Write-Host "Converting $source with $TransformConfig to $source"

    & ".\ctt.exe" s:$source t:$TransformConfig d:$source

    Remove-Item "$folder\app.*.config"
}

Write-Host "Changing configuration for environment $environment"

foreach($role in $XmlDocument.ServiceConfiguration.Role.name){
    if(Test-Path $octopusServiceUnpackFolder){
        if(Test-Path $octopusServiceUnpackFolder\$role){
            if(IsWebRole){
Write-Debug "$role is a webrole"
                TransformWebConfig $octopusServiceUnpackFolder\$role\"approot" $environment
                TransformWebConfig $octopusServiceUnpackFolder\$role\"sitesroot\0" $environment
            }else {
Write-Debug "$role is a workerrole"
                TransformAppConfig $octopusServiceUnpackFolder\$role\"approot" $role $environment
            }
        }
        else {
            Write-Warning "Error finding role $role"
        }
    }else {
        Write-Warnin "Octopus service unpack folder not found"
    }
}
Any questions? Don't hesitate to ask! Find me on LinkedIn or Twitter. In a next blog I'll write about deploying your application to an Azure Web App. Happy Deploying!
.png?width=450&height=450&mode=crop)