 |
Everyone has been in a situation where your application is behaving differently on your production environment compared to how it behaves on your testing environment. Most of the time this is because these environments aren’t identical and even if they were at the beginning, it’s hard to keep them in sync with all the modifications and updates. Or think of the situation in which you need an extra server to test a new feature or need a new server because your current one cannot keep up with the load. In these situations, Infrastructure as Code is your answer (and to a lot of other problems). Infrastructure as Code is the process of managing and provisioning computing infrastructure and their configuration through code. It's a very nice addition to the principles of Continuous Delivery as with these techniques one can manage ingrastructure during deployment of an application. |
At a high level this blog will cover:
- Using Azure Automation DSC to manage server configurations
- Using Azure RM to create a new virtual machine
- Using Chocolatey to create and maintain a package of a custom application
- Using Octopus Deploy to release a web application
Azure Automation DSC

In this blog, I will be using a Windows Server on which I want to install multiple applications. Since I want to be able to delete and re-create this machine automatically we need something that manages this machines configuration. This is where Azure Automation DSC shines. It allows you to author and manage PowerShell Desired State Configurations. Desired state configuration enables you to declaratively say ‘Here is how I want this machine to be configured’ instead of writing scripts to do so. For example, you can say, “I want Chocolatey installed, I want IIS installed, I want port 80 opened”. These DSC items will be placed on the Azure Automation DSC pull server so that target nodes (such as physical and virtual machines) in the cloud or on-premises can pick them up, automatically conform to the desired state they specify, and report back on their compliance with the desired state to Azure Automation. To create an Azure Automation account and setup a DSC pull server use the portal or run the following PowerShell script:
New-AzureRmResourceGroup –Name MY-AUTOMATION-RG –Location MY-RG-LOCATION-IN-QUOTES
New-AzureRmAutomationAccount –ResourceGroupName MY-AUTOMATION-RG –Location MY-RG-LOCATION-IN-QUOTES –Name MY-AUTOMATION-ACCOUNT
Next we need to create our first DSC configuration and add it to the pull server. The configuration contains a Configuration block. You define it by using the Configuration keyword and providing a name. In this case, the name of the configuration is "ServerConfig”. Within this block there are one or more Node blocks. These define the VMs that you are configuring. In this example there is one Node “webserver”. Within this node there a multiple Resource blocks. This is where the configuration sets the properties for the resources that it is configuring. In this example there are blocks to install IIS, install IIS manager, install Chocolatey, install ASP.net 4.5, remove the default website from IIS and use Choclatey to install a self-made package to install the Octopus Tentacle. This last step uses a self-made package from a custom location using myget.org. More on creating this package later in this blog. As you can see, steps can depend on each other to make sure they are executed in the right order. It’s important to know that the name of the configuration and the name of the node are used later on to specify which configuration should be applied to the new VM. In this example this becomes ‘ServerConfig.webserver’. As you can see there are two imports at the top of the file. These are needed because they are not in the default installed list of DSC Resources. To be able to use them we need to add them to our pull server. Open the Azure portal, navigate to your Automation account and click on Assets and the Modules. Click on browse Gallery and search for cChoco and xWebAdministration. Install both.
Configuration ServerConfig
{
    Import-DscResource -ModuleName cChoco
    Import-DscResource -Module xWebAdministration
    Node "webserver" {

        cChocoInstaller installChoco
        {
            InstallDir = "C:\choco"
        }

        WindowsFeature installIIS
        {
            Ensure="Present"
            Name="Web-Server"
        }

        WindowsFeature installIISManagementConsole
        {
            Ensure="Present"
            Name="Web-Mgmt-Console"
        }

        WindowsFeature installWebAspNet45
        {
            Ensure="Present"
            Name="Web-Asp-Net45"
        }

        # Stop the default website
         xWebsite DefaultSite
         {
             Ensure          = 'Present'
             Name            = 'Default Web Site'
             State           = 'Stopped'
             PhysicalPath    = 'C:\inetpub\wwwroot'
             DependsOn       = '[WindowsFeature]installIIS'
        }

        cChocoPackageInstaller octopusTentacle
        {
            Name = "octopustentacle"
            Params = '/octopusServerURL="<serverUrl>" /thumprint="" /apiKey="" /role=""'
            Source = "https://www.myget.org/F/staalit/api/v2"
            DependsOn = "[cChocoInstaller]installChoco"
        }
    }
}
Once we are done with creating this configuration we need to add it to the pull server and compile it. Run the following script to do so.
$automationAccountName = "MY-AUTOMATION-ACCOUNT"
$automationResourceGroup = "MY-AUTOMATION-RG"

Login-AzureRmAccount

Import-AzureRmAutomationDscConfiguration -ResourceGroupName $automationResourceGroup –AutomationAccountName $automationAccountName -SourcePath C:\ServerConfig.ps1 -Published –Force

$jobData = Start-AzureRmAutomationDscCompilationJob -ResourceGroupName $automationResourceGroup –AutomationAccountName $automationAccountName -ConfigurationName ServerConfig

$compilationJobId = $jobData.Id

Get-AzureRmAutomationDscCompilationJob -ResourceGroupName $automationResourceGroup –AutomationAccountName $automationAccountName -Id $compilationJobId
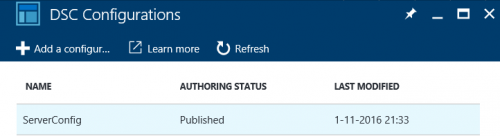
Within the portal, you should know see one configuration that has been published.
Azure Resource Manager
 |
Running an application typically requires different components, for example virtual machines, databases, storage queues, etc. You see them as related and interdependent parts of your infrastructure. Azure resource manager enables you to deploy, manage and monitor them as a group. This group is called a ‘Resource Group’ and this basically is a container holding your resources. A resource is a through Azure manageable item, for example a virtual machine. Resources and resource groups are managed using resource providers. Every resource provider offers operations for working with the resources that are deployed. A common resource provider is Microsft.Compute which supplies the virtual machine resource. Resources can be managed within the Azure portal, using PowerShell API’s or by using a resource template. Using a ‘Resource Manager template’ one can declaratively define one or more resources to deploy to a resource group. This template defines the relations between the resources and can be used to deploy the resources consistently and repeatedly. In this blog, I’ll be using a template. |
A template contains the following elements:
{
   "$schema": "http://schema.management.azure.com/schemas/2015-01-01/deploymentTemplate.json#",
   "contentVersion": "",
   "parameters": {  },
   "variables": {  },
   "resources": [  ],
   "outputs": {  }
}
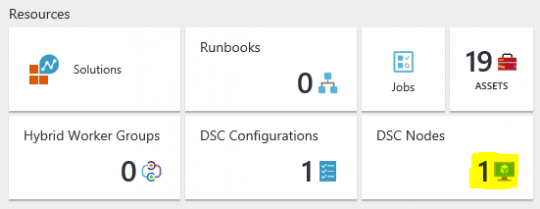
Parameters are values that are provided during deployment to customize resource deployment. Variables are values that are used in the template to simplify reuse of values. Resources are the types that are deployed or updated in a resource group. Outputs are values that are returned after deployment. Here you can find more details on the templates. I will now discuss a few details. While deploying this template it will ask you for a registration key. You can find this one in the Azure portal within your automation account. Go to all settings -> keys. This template creates a Windows Server 2012 Virtual machine and all of its needed resources like storage and network interfaces. It creates a Network security group which opens ports 80 (http), 3389 (RDP) and 10933 (Octopus Tentacle). Most important for this demo is the installation of the PowerShell DSC Extension and the configuration of it. Here you’ll need to replace the RegistrationUrl with the url of your Automation account. You can find this url on the same page as the key. Another thing to point out is the NodeConfigurationName property. This is now set to ServerConfig.webserver and is used to tell this server which configuration it should read from the DSC pull server and apply. Below you will find my template.json and a script to deploy this template. Once this deployment completes you should see a new VM in the portal and have one DSC Node in your Automation account.
{
"$schema": "http://schema.management.azure.com/schemas/2014-04-01-preview/deploymentTemplate.json#",
"contentVersion": "1.0.0.0",
"parameters": {
"vmName": {
"type": "string",
"metadata": {
"Description": "Name for the Virtual Machine."
}
},
"registrationKey": {
"type": "string",
"metadata": {
"description": "Registration key to use to onboard to the Azure Automation DSC pull/reporting server"
}
},
"adminUsername": {
"type": "string",
"defaultValue": "staal",
"metadata": {
"Description": "Admin Username for the Virtual Machine."
}
},
"adminPassword": {
"type": "securestring",
"metadata": {
"Description": "Password for the Virtual Machine."
}
}
},
"variables": {
"location": "West Europe",
"STAName": "[concat(parameters('vmName'),'storname')]",
"pubName": "MicrosoftWindowsServer",
"ResourceGroup": "VMResourceGroup",
"offerName": "WindowsServer",
"diskName": "[concat(parameters('vmName'), 'OSDisk')]",
"nicName": "[concat(parameters('vmName'),'NIC')]",
"skuName": "2012-R2-Datacenter",
"STAType": "Standard_GRS",
"pubIPName": "[concat(parameters('vmName'),'publicip')]",
"pubIPType": "Dynamic",
"networkSecurityGroupName": "[concat(parameters('vmName'),'networkSecurityGroup')]",
"virtualNetworkName": "[concat(parameters('vmName'),'virtualNetworkName')]",
"subnetName": "[concat(parameters('vmName'),'subnetName')]",
"vmStorageAccountContainerName": "vhds",
"vmSize": "Standard_DS1",
"vNetName": "VirtualNetwork1",
"vnetID": "[resourceId(variables('ResourceGroup'),'Microsoft.Network/virtualNetworks',variables('vNetName'))]",
"subnetRef": "[concat(variables('vnetID'),'/subnets/',variables('subnetName'))]"
},
"resources": [
{
"type": "Microsoft.Storage/storageAccounts",
"name": "[variables('STAName')]",
"apiVersion": "2015-05-01-preview",
"location": "[variables('location')]",
"properties": {
"accountType": "[variables('STAType')]"
}
},
{
"type": "Microsoft.Network/publicIPAddresses",
"name": "[variables('pubIPName')]",
"apiVersion": "2015-05-01-preview",
"location": "[variables('location')]",
"properties": {
"publicIPAllocationMethod": "[variables('pubIPType')]",
"idleTimeoutInMinutes": 4
},
"resources": [],
"dependsOn": []
},
{
"type": "Microsoft.Network/networkInterfaces",
"name": "[variables('nicName')]",
"apiVersion": "2015-05-01-preview",
"location": "[variables('location')]",
"properties": {
"ipConfigurations": [
{
"name": "ipconfig1",
"properties": {
"privateIPAllocationMethod": "Dynamic",
"publicIPAddress": {
"id": "[resourceId('Microsoft.Network/publicIPAddresses',variables('pubIPName'))]"
},
"subnet": {
"id": "[concat(resourceId('Microsoft.Network/virtualNetworks', variables('virtualNetworkName')), '/subnets/default')]"
}
}
}
],
"dnsSettings": {
"dnsServers": []
},
"enableIPForwarding": false,
"networkSecurityGroup": {
"id": "[resourceId('Microsoft.Network/networkSecurityGroups', variables('networkSecurityGroupName'))]"
}
},
"resources": [],
"dependsOn": [
"[resourceId('Microsoft.Network/publicIPAddresses', variables('pubIPName'))]",
"[resourceId('Microsoft.Network/virtualNetworks', variables('virtualNetworkName'))]",
"[resourceId('Microsoft.Network/networkSecurityGroups', variables('networkSecurityGroupName'))]"
]
},
{
"type": "Microsoft.Network/virtualNetworks",
"name": "[variables('virtualNetworkName')]",
"apiVersion": "2015-05-01-preview",
"location": "[variables('location')]",
"properties": {
"addressSpace": {
"addressPrefixes": [
"10.1.0.0/24"
]
},
"subnets": [
{
"name": "default",
"properties": {
"addressPrefix": "10.1.0.0/24"
}
}
]
},
"resources": [],
"dependsOn": []
},
{
"type": "Microsoft.Network/networkSecurityGroups",
"name": "[variables('networkSecurityGroupName')]",
"apiVersion": "2015-05-01-preview",
"location": "[variables('location')]",
"properties": {
"securityRules": [
{
"name": "default-allow-rdp",
"properties": {
"protocol": "TCP",
"sourcePortRange": "*",
"destinationPortRange": "3389",
"sourceAddressPrefix": "*",
"destinationAddressPrefix": "*",
"access": "Allow",
"priority": 1000,
"direction": "Inbound"
}
},
{
"name": "Octopus-Tentacle",
"properties": {
"protocol": "*",
"sourcePortRange": "*",
"destinationPortRange": "10933",
"sourceAddressPrefix": "*",
"destinationAddressPrefix": "*",
"access": "Allow",
"priority": 1010,
"direction": "Inbound"
}
},
{
"name": "Http",
"properties": {
"protocol": "TCP",
"sourcePortRange": "*",
"destinationPortRange": "80",
"sourceAddressPrefix": "*",
"destinationAddressPrefix": "*",
"access": "Allow",
"priority": 1020,
"direction": "Inbound"
}
}
]
},
"resources": [],
"dependsOn": []
},
{
"type": "Microsoft.Compute/virtualMachines/extensions",
"name": "[concat(parameters('vmName'),'/Microsoft.Powershell.DSC')]",
"apiVersion": "2015-05-01-preview",
"location": "[variables('location')]",
"tags": {},
"properties": {
"publisher": "Microsoft.Powershell",
"type": "DSC",
"typeHandlerVersion": "2.19",
"autoUpgradeMinorVersion": false,
"protectedSettings": {
"Items": {
"registrationKeyPrivate": "[parameters('registrationKey')]"
}
},
"settings": {
"ModulesUrl": "https://eus2oaasibizamarketprod1.blob.core.windows.net/automationdscpreview/RegistrationMetaConfigV2.zip",
"ConfigurationFunction": "RegistrationMetaConfigV2.ps1\\RegistrationMetaConfigV2",
"Properties": [
{
"Name": "RegistrationKey",
"Value": {
"UserName": "PLACEHOLDER_DONOTUSE",
"Password": "PrivateSettingsRef:registrationKeyPrivate"
},
"TypeName": "System.Management.Automation.PSCredential"
},
{
"Name": "RegistrationUrl",
"Value": "https://we-agentservice-prod-1.azure-automation.net/accounts/0321d4f3-4887-4ebd-85b2-1552553a67f4",
"TypeName": "System.String"
},
{
"Name": "NodeConfigurationName",
"Value": "ServerConfig.webserver",
"TypeName": "System.String"
},
{
"Name": "ConfigurationMode",
"Value": "applyAndMonitor",
"TypeName": "System.String"
},
{
"Name": "ConfigurationModeFrequencyMins",
"Value": "15",
"TypeName": "System.Int32"
},
{
"Name": "RefreshFrequencyMins",
"Value": "30",
"TypeName": "System.Int32"
},
{
"Name": "RebootNodeIfNeeded",
"Value": false,
"TypeName": "System.Boolean"
},
{
"Name": "ActionAfterReboot",
"Value": "continueConfiguration",
"TypeName": "System.String"
},
{
"Name": "AllowModuleOverwrite",
"Value": false,
"TypeName": "System.Boolean"
},
{
"Name": "Timestamp",
"Value": "30-10-2016 22:41:42",
"TypeName": "System.String"
}
]
}
},
"resources": [],
"dependsOn": [
"[resourceId('Microsoft.Compute/virtualMachines', parameters('vmName'))]"
]
},
{
"apiVersion": "2015-05-01-preview",
"type": "Microsoft.Compute/virtualMachines",
"name": "[parameters('vmName')]",
"location": "[variables('location')]",
"dependsOn": [
"[concat('Microsoft.Storage/storageAccounts/', variables('STAName'))]",
"[concat('Microsoft.Network/networkInterfaces/', variables('nicName'))]"
],
"properties": {
"hardwareProfile": {
"vmSize": "[variables('vmSize')]"
},
"osProfile": {
"computername": "[parameters('vmName')]",
"adminUsername": "[parameters('adminUsername')]",
"adminPassword": "[parameters('adminPassword')]"
},
"storageProfile": {
"imageReference": {
"publisher": "[variables('pubName')]",
"offer": "[variables('offerName')]",
"sku" : "[variables('skuName')]",
"version":"latest"
},
"osDisk" : {
"name": "osdisk",
"vhd": {
"uri": "[concat('http://',variables('STAName'),'.blob.core.windows.net/',variables('vmStorageAccountContainerName'),'/',variables('diskName'),'.vhd')]"
},
"caching": "ReadWrite",
"createOption": "FromImage"
}
},
"networkProfile": {
"networkInterfaces": [
{
"id": "[resourceId('Microsoft.Network/networkInterfaces',variables('nicName'))]"
}
]
}
}
}
],
"outputs": { }
}
<#
 .SYNOPSIS
    Deploys a template to Azure

 .DESCRIPTION
    Deploys an Azure Resource Manager template

 .PARAMETER subscriptionId
    The subscription id where the template will be deployed.

 .PARAMETER resourceGroupName
    The resource group where the template will be deployed. Can be the name of an existing or a new resource group.

 .PARAMETER resourceGroupLocation
    Optional, a resource group location. If specified, will try to create a new resource group in this location. If not specified, assumes resource group is existing.

 .PARAMETER deploymentName
    The deployment name.

 .PARAMETER templateFilePath
    Optional, path to the template file. Defaults to template.json.

 .PARAMETER parametersFilePath
    Optional, path to the parameters file. Defaults to parameters.json. If file is not found, will prompt for parameter values based on template.
#>

param(
 [Parameter(Mandatory=$True)]
 [string]
 $subscriptionId,

 [Parameter(Mandatory=$True)]
 [string]
 $resourceGroupName,

 [string]
 $resourceGroupLocation,

 [Parameter(Mandatory=$True)]
 [string]
 $deploymentName,

 [string]
 $templateFilePath = "template.json",

 [string]
 $parametersFilePath = "parameters.json"
)

<#
.SYNOPSIS
    Registers RPs
#>
Function RegisterRP {
    Param(
        [string]$ResourceProviderNamespace
    )

    Write-Host "Registering resource provider '$ResourceProviderNamespace'";
    Register-AzureRmResourceProvider -ProviderNamespace $ResourceProviderNamespace;
}

#******************************************************************************
# Script body
# Execution begins here
#******************************************************************************
$ErrorActionPreference = "Stop"

# sign in
Write-Host "Logging in...";
Login-AzureRmAccount;

# select subscription
Write-Host "Selecting subscription '$subscriptionId'";
Select-AzureRmSubscription -SubscriptionID $subscriptionId;

# Register RPs
$resourceProviders = @("microsoft.automation","microsoft.compute","microsoft.network","microsoft.storage");
if($resourceProviders.length) {
    Write-Host "Registering resource providers"
    foreach($resourceProvider in $resourceProviders) {
        RegisterRP($resourceProvider);
    }
}

#Create or check for existing resource group
$resourceGroup = Get-AzureRmResourceGroup -Name $resourceGroupName -ErrorAction SilentlyContinue
if(!$resourceGroup)
{
    Write-Host "Resource group '$resourceGroupName' does not exist. To create a new resource group, please enter a location.";
    if(!$resourceGroupLocation) {
        $resourceGroupLocation = Read-Host "resourceGroupLocation";
    }
    Write-Host "Creating resource group '$resourceGroupName' in location '$resourceGroupLocation'";
    New-AzureRmResourceGroup -Name $resourceGroupName -Location $resourceGroupLocation
}
else{
    Write-Host "Using existing resource group '$resourceGroupName'";
}

# Start the deployment
Write-Host "Starting deployment...";
if(Test-Path $parametersFilePath) {
    New-AzureRmResourceGroupDeployment -ResourceGroupName $resourceGroupName -TemplateFile $templateFilePath -TemplateParameterFile $parametersFilePath;
} else {
    New-AzureRmResourceGroupDeployment -ResourceGroupName $resourceGroupName -TemplateFile $templateFilePath;
}
Chocolatey
 |
For Azure Automation DSC to be able to apply configuration it needs to know how to do so and for this it uses DSC Resources. These provide the building blocks for a DSC configuration and the expose properties and contains the PowerShell scripts to configure the resource. Within Azure DSC there a build in resources that you can use. For example, there is one to install IIS. You can also create these on your own to implement one for your own application. I decided to take in one step further and use Chocolatey instead. Chocolatey is a Windows package manager that allows you to install for example Google Chrome using one command line statement. Azure DSC has a resource that you can use to install Chocolatey packages. I will use a custom created Chocolatey package to install the Octopus Tentacle. I won’t go into too much details on Octopus here. For now, it is important to know that Octopus runs on its own server and that you install an Octopus Tentacle on every other server to which you want to deploy your application. To create a Chocolatey package we first need to install Chocolatey from chocolatey.org. Once we’ve done that we create a nuspec file with the following contents: |
<?xml version="1.0"?>
<package xmlns:xsi="http://www.w3.org/2001/XMLSchema-instance" xmlns:xsd="http://www.w3.org/2001/XMLSchema">
  <metadata>
    <id>octopustentacle</id>
    <title>octopustentacle</title>
    <version>0.0.8</version>
    <authors>Staal IT</authors>
    <owners>Staal IT</owners>
    <summary>Octopus Tentacle installation</summary>
    <description>Your descriptions here</description>
    <projectUrl>http://www.staal-it.nl</projectUrl>
    <licenseUrl>http://www.staal-it/license.txt</licenseUrl>
    <requireLicenseAcceptance>false</requireLicenseAcceptance>
    <iconUrl>http://www.myapp.tld/logo.png</iconUrl>
  </metadata>
</package>
Within the same directory as this nuspec file create a folder named tools. Within this folder create a powershell file named chocolateyInstall.ps1. A very simple installation would look like:
Install-ChocolateyPackage 'MyApp' 'msi' '/quiet' 'http://myapp.tld/myapp-0.1.0-x86.msi' 'http://myapp.tld/myapp-0.1.0.msi'
Installing the Octopus Tentacle is a bit harder. Mostly because I want to be able to pass in some variables to the process. Once you are done with the installation script, run cpack from within the package directory and your package will be created. I’ve used myget.org as a free package server. Create your own repository and upload your package. You are off course free to use mine.
$arguments = @{}

  # Now we can use the $env:chocolateyPackageParameters inside the Chocolatey package
  $packageParameters = $env:chocolateyPackageParameters

  Write-Host $packageParameters

  # Default the values
  $octopusServerURL = "<octopusServerURL>"
  $thumprint = "<thumprint>"
  $apiKey = "<apiKey>"
  $role = "web-server"

  # Now parse the packageParameters using good old regular expression
  if ($packageParameters) {
      $match_pattern = "\/(?<option>([a-zA-Z]+)):(?<value>([`"'])?([a-zA-Z0-9- _\\:\.]+)([`"'])?)|\/(?<option>([a-zA-Z]+))"
      $option_name = 'option'
      $value_name = 'value'

      if ($packageParameters -match $match_pattern ){
          $results = $packageParameters | Select-String $match_pattern -AllMatches
          $results.matches | % {
            $arguments.Add(
                $_.Groups[$option_name].Value.Trim(),
                $_.Groups[$value_name].Value.Trim())
        }
      }
      else
      {
          Throw "Package Parameters were found but were invalid (REGEX Failure)"
      }

      if ($arguments.ContainsKey("octopusServerURL")) {
          Write-Host "octopusServerURL Argument Found"
          $octopusServerURL = $arguments["octopusServerURL"]
      }

      if ($arguments.ContainsKey("thumprint")) {
          Write-Host "thumprint Argument Found"
          $thumprint = $arguments["thumprint"]
      }

      if ($arguments.ContainsKey("apiKey")) {
          Write-Host "apiKey Argument Found"
          $apiKey = $arguments["apiKey"]
      }

  if ($arguments.ContainsKey("role")) {
          Write-Host "role Argument Found"
          $role = $arguments["role"]
      }
  } else {
      Write-Debug "No Package Parameters Passed in"
  }

Install-ChocolateyPackage `
    -PackageName 'octopustentacle' `
    -FileType 'msi' `
    -SilentArgs '/quiet' `
    -Url 'https://download.octopusdeploy.com/octopus/Octopus.Tentacle.3.4.14.msi' `
    -Url64bit 'https://download.octopusdeploy.com/octopus/Octopus.Tentacle.3.4.14-x64.msi' `
    -Checksum 'ED95CB194A124C7BD5D67978EDCE722C139A4F80A0B46D6531923B112D032F77' `
    -ChecksumType 'SHA256' `
    -Checksum64 '7A468F71B18E099BB3CCC81D603CC3225114D67F516D397F8A61EB03DBCEEE55' `
    -ChecksumType64 'SHA256'

$tentacleAddress = "$((Invoke-WebRequest ifconfig.co/ip -UseBasicParsing).Content.Trim())"

cd "C:\Program Files\Octopus Deploy\Tentacle"


& .\Tentacle.exe create-instance --instance "Tentacle" --config "C:\Octopus\Tentacle.config" --console
& .\Tentacle.exe new-certificate --instance "Tentacle" --if-blank --console
& .\Tentacle.exe configure --instance "Tentacle" --reset-trust --console
& .\Tentacle.exe configure --instance "Tentacle" --home "C:\Octopus" --app "C:\Octopus\Applications" --port "10933" --console
& .\Tentacle.exe configure --instance "Tentacle" --trust $thumprint-console
netsh advfirewall firewall add rule "name=Octopus Deploy Tentacle" dir=in action=allow protocol=TCP localport=10933
& .\Tentacle.exe register-with --instance "Tentacle" --server $octopusServerURL --publicHostName $tentacleAddress --apiKey=$apiKey --role $role --environment "Test" --comms-style TentaclePassive --console
& .\Tentacle.exe service --instance "Tentacle" --install --start --console
Octopus Deploy
 |
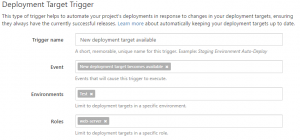
Octopus Deploy is an automated software deployment and release management server. It is designed to simplify deployment of ASP.NET applications, Windows Services and databases. Since version 3.4 Octopus lets you trigger a deployment when it detects that a new tentacle has been installed. This means that when our server is installed using DSC, Octopus will detect it and automatically deploy the latest version of our application to it. If you don’t already own an Octopus server you can easily create one within Azure. Go to Virtual Machines, click add and search for Octopus Deploy. Within Octopus go to Environments. If the deployment of the template succeeded and the DSC config has been applied to the VM, you should see an new deployment target. Now create a new project and configure it to deploy a package to an IIS server. Here you can find more details on how to do that if you are new to this. While you are on the project page go to Triggers and click Create trigger. Give it a nice name and select ‘New deployment target becomes available’ in the Event drop-down. For Environments choose the first environment in your deployment pipeline. For Roles choose the role that you have specified while installing the tentacle using Chocolatey. |
Now when Octopus detects the new tentacle it should deploy the latest version of your application to the new server.
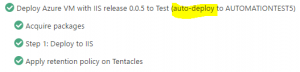
And there you are! Now you can issue one PowerShell statement and a completely new VM is automatically created en maintained using PowerShell DSC and Octopus Deploy!
.png?width=450&height=450&mode=crop)